Use controls on this page to add realistic 3D picture frame with texture overlay or bevel effect to your images.
This page has three modes:
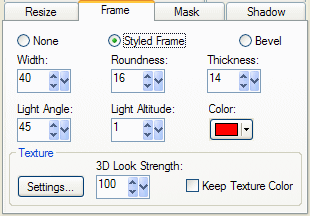
None - switch off all frame and bevel effects.
Styled Frame - enable picture frame effect on the image.
Bevel - enable bevel effect.

Width: In Styled Frame and Bevel modes use this control to set either frame or bevel width measured from the image boundaries.
Roundness: Set the roundness ratio of frame or bevel shape by this control. 0% Roundness means square shaped frame or bevel while 100% roundness creates an elliptic shape of frame or bevel and the image itself. The intermediate values give us rounded rectangle shape where the roundness radius is proportional to the parameter value
Thickness: Set the "Thickness" of the frame or bevel. This parameter controls the third dimension of either frame or bevel. Increase this parameter value to get more 3D look effect.
Light Angle: Set the direction from where the frame or bevel is lit. 0 value corresponds to the position of light source on top, going counter-clockwise while the parameter is increased.
Light Altitude: Specify the altitude of the light measured in degrees from the image plane.
Color: Invoke the frame color control. You can either pick the predefined color from a list, invoke the standard Windows color dialog by pressing More Colors... button or pick a color from the Preview window or screen by pressing Click to pick from screen button.
The texture can be applied to the frame only.
3D Look Strength: Make your texture look three-dimentional! This parameter controls the strength of 3D look of a texture.
Keep Texture Color: When this checkbox is on, the texture retains its original color values. Uncheck this checkbox to transfer the color specified by Color control to the texture.
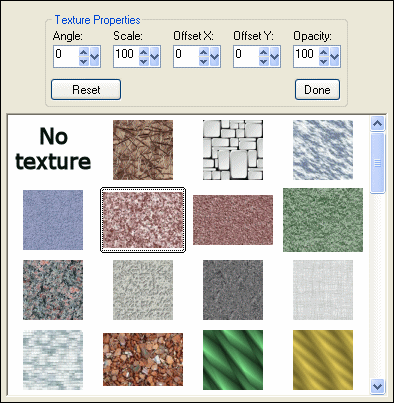
Press Settings... button to invoke texture settings dialog.

Click on the texture thumbnail to select the texture image that will be overlayed on the frame. Click on No Texture thumbnail to switch off the texture overlay. The texture images are located in /Textures directory of the main application install folder. You can copy your custom textures to this folder or create subfolders of images there if you want to apply your own textures to the picture frame.
Angle: Specify the texture rotation angle.
Scale: Specify the texture scale.
OffsetX, OffsetY: Specify the vertical and horizontal shift of a texture.
Opacity: Set the texture opacity.
Reset: Press the Reset button to set the default values to all texture settings.
Done: Close the Texture Settings dialog.